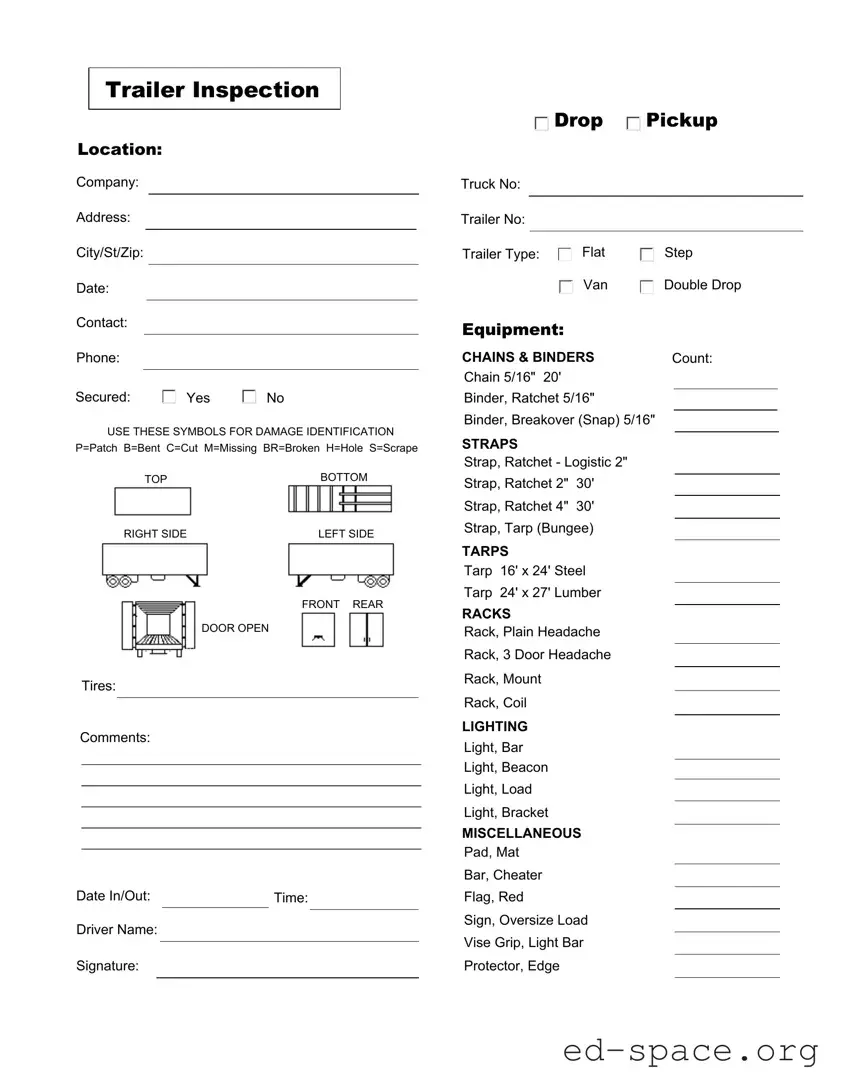
The Trailer Inspection form is a critical tool for ensuring the safety and compliance of trailers used in transportation. This form collects essential information about the trailer, including its location, type, and equipment specifications. Key details such as the company name, address, and contact information are required to establish accountability. The inspection date and the names of the driver and the truck associated with the trailer are also recorded. This form includes a section for damage identification, where specific symbols indicate the condition of various parts of the trailer, such as patches, bends, and cuts. The inspection covers vital components like tires, chains, binders, and lighting, ensuring that all equipment is in proper working order. Additionally, there is space for comments, allowing inspectors to note any concerns that may arise during the evaluation. By systematically documenting these aspects, the Trailer Inspection form helps maintain safety standards and supports the overall integrity of the transportation process.
| Fact Name | Description |
|---|---|
| Inspection Purpose | The Trailer Inspection form is used to assess the condition and safety of a trailer before it is put into service. |
| Required Information | Key details such as company name, address, trailer number, and inspection date must be filled out for proper documentation. |
| Damage Identification | Specific symbols are used to identify damage on the trailer, including 'P' for Patch and 'BR' for Broken. |
| Legal Compliance | In many states, trailer inspections are governed by state vehicle codes, which require regular safety checks. |
| Contact Information | The form requires a contact person’s name and phone number for any follow-up questions regarding the inspection. |
| Signature Requirement | A driver's signature is needed to confirm that the inspection has been completed and the information is accurate. |
Filling out the Trailer Inspection form accurately is essential for ensuring safety and compliance. After completing the form, it will be submitted to the relevant authority for review and record-keeping. Follow these steps carefully to ensure all necessary information is captured.
What is the purpose of the Trailer Inspection form?
The Trailer Inspection form serves as a comprehensive checklist to ensure that trailers are in safe and operational condition before they are used for transport. By documenting the condition of various components, such as tires, chains, and lighting, the form helps identify any damage or maintenance needs. This proactive approach not only enhances safety but also ensures compliance with industry regulations.
What information do I need to fill out on the form?
When completing the Trailer Inspection form, you will need to provide specific details such as the location of the inspection, the pickup company’s name, the address, and the date of the inspection. Additionally, you should include contact information, truck and trailer numbers, and the type of trailer being inspected. It’s important to note any damage using the designated symbols, as well as to record the condition of equipment, tires, and any additional comments that may be relevant.
How do I identify damage on the trailer?
The form includes a section specifically for damage identification. You will use symbols such as P for Patch, B for Bent, C for Cut, M for Missing, BR for Broken, H for Hole, and S for Scrape. These symbols should be marked on the appropriate areas of the trailer, including the top, bottom, sides, front, rear, and door. This visual representation makes it easier to communicate the trailer's condition to maintenance personnel or other stakeholders.
What should I do after completing the Trailer Inspection form?
Once the Trailer Inspection form is filled out, it should be reviewed for accuracy. Ensure that all necessary fields are completed and that any noted damages are clearly identified. After the review, the form should be signed by the driver to confirm that the inspection has been conducted. Keep a copy of the completed form for your records, as it may be needed for future reference or compliance checks.
Failing to provide the Trailer Inspection Location. This is essential for identifying where the inspection took place.
Not including the Company Name. The company responsible for the trailer must be clearly stated.
Omitting the Contact Information. A contact person should be listed to facilitate communication.
Leaving out the Truck Number and Trailer Number. These identifiers are crucial for tracking and accountability.
Incorrectly marking the Trailer Type. Accurate classification helps in assessing the trailer's suitability for specific loads.
Not specifying whether the trailer is Secured. Indicate whether the trailer is secured with a simple "Yes" or "No".
Using unclear symbols for Damage Identification. Ensure that the symbols used (P, B, C, etc.) are clearly defined and understood.
Failing to comment on the Tires. Provide details about tire conditions, as this can affect safety.
Not recording the Date In/Out and Time. Accurate timing is important for inspection records.
Neglecting to obtain the Driver Name and Signature. This serves as verification of the inspection.
Each of these mistakes can lead to complications in the inspection process and may affect safety and compliance. Attention to detail is crucial when filling out the Trailer Inspection form.
When conducting a trailer inspection, several other forms and documents may be utilized alongside the Trailer Inspection form. These documents help ensure compliance with safety regulations, maintain accurate records, and facilitate communication among parties involved in the transportation process. Below are four commonly used forms that complement the Trailer Inspection form.
Utilizing these forms in conjunction with the Trailer Inspection form fosters a comprehensive approach to safety and compliance in the transportation industry. Proper documentation not only protects the interests of all parties involved but also enhances the overall efficiency of the logistics process.
Vehicle Inspection Report: Like the Trailer Inspection form, this document outlines the condition of a vehicle before it is used. It includes details about the vehicle's parts and systems, ensuring everything is functioning correctly and safely.
Equipment Inspection Checklist: This checklist serves a similar purpose for various types of equipment. It helps ensure that each piece of equipment is in good working order, identifying any necessary repairs or maintenance before use.
Pre-Trip Inspection Form: Commonly used by truck drivers, this form requires drivers to assess their vehicle before starting a trip. It emphasizes safety and compliance, similar to the trailer inspection process.
Maintenance Log: This document tracks the service history of a trailer or vehicle. It provides insights into past inspections and repairs, helping to ensure ongoing safety and reliability.
Load Securement Checklist: This checklist focuses on the proper securing of loads in a trailer. It parallels the Trailer Inspection form by emphasizing safety and compliance with regulations.
Accident Report Form: In the event of an incident, this form captures details about the accident and vehicle condition. It serves as a record, much like the Trailer Inspection form, which documents the state of the trailer before use.
Safety Inspection Report: This report assesses compliance with safety regulations. It shares similarities with the Trailer Inspection form by ensuring that all safety measures are in place and functioning.
Daily Vehicle Inspection Report: Used by fleet operators, this report captures daily checks of vehicle conditions. It emphasizes the importance of routine inspections, akin to the trailer inspection process.
Incident Report Form: Similar in nature, this form documents any incidents involving a vehicle or trailer. It provides a record of conditions and circumstances, much like the inspection form does for pre-use assessments.
When filling out the Trailer Inspection form, attention to detail is crucial. Here are four things you should and shouldn't do to ensure accuracy and clarity.
By following these guidelines, you can help ensure that the inspection process runs smoothly and effectively. Clear communication is key in maintaining safety and efficiency in operations.
Misconceptions about the Trailer Inspection form can lead to confusion and errors during the inspection process. Here are seven common misconceptions:
Understanding these misconceptions can help ensure a more effective and compliant trailer inspection process.
When filling out and using the Trailer Inspection form, consider the following key takeaways: